Showing posts with label fosshape. Show all posts

Thursday, 1 March 2018

Snow White: Part Four

I've got some amazing photos of our 2017 Panto back from the Mercury Theatre.  I believe these were all taken by Robert Workman.  Costumes and set designed by David Shields.

Animal costumes for the Junior Chorus by me.  Snow White's costume by Fran Gyll. 


Nurse Nellie costume by me.  I didn't actually make any wigs this year, we revamped a few old ones for the other Nellie costumes, but this one was made by Ruth Metcalf.   Muddles's costume is by Corinna Vincent.

Nurse Nellie costume by me.  So happy with this one in particular!  I made all that stripey trim myself out of gold braid stitched onto a black fabric backing.

Nurse Nellie's butterfly costume for the finale.  Loved this one as well, especially the headdress, although there aren't any photos that really show it off.  Unfortunately there aren't any production photos of the dressing gown and the mirror costume I made for the dame this year.

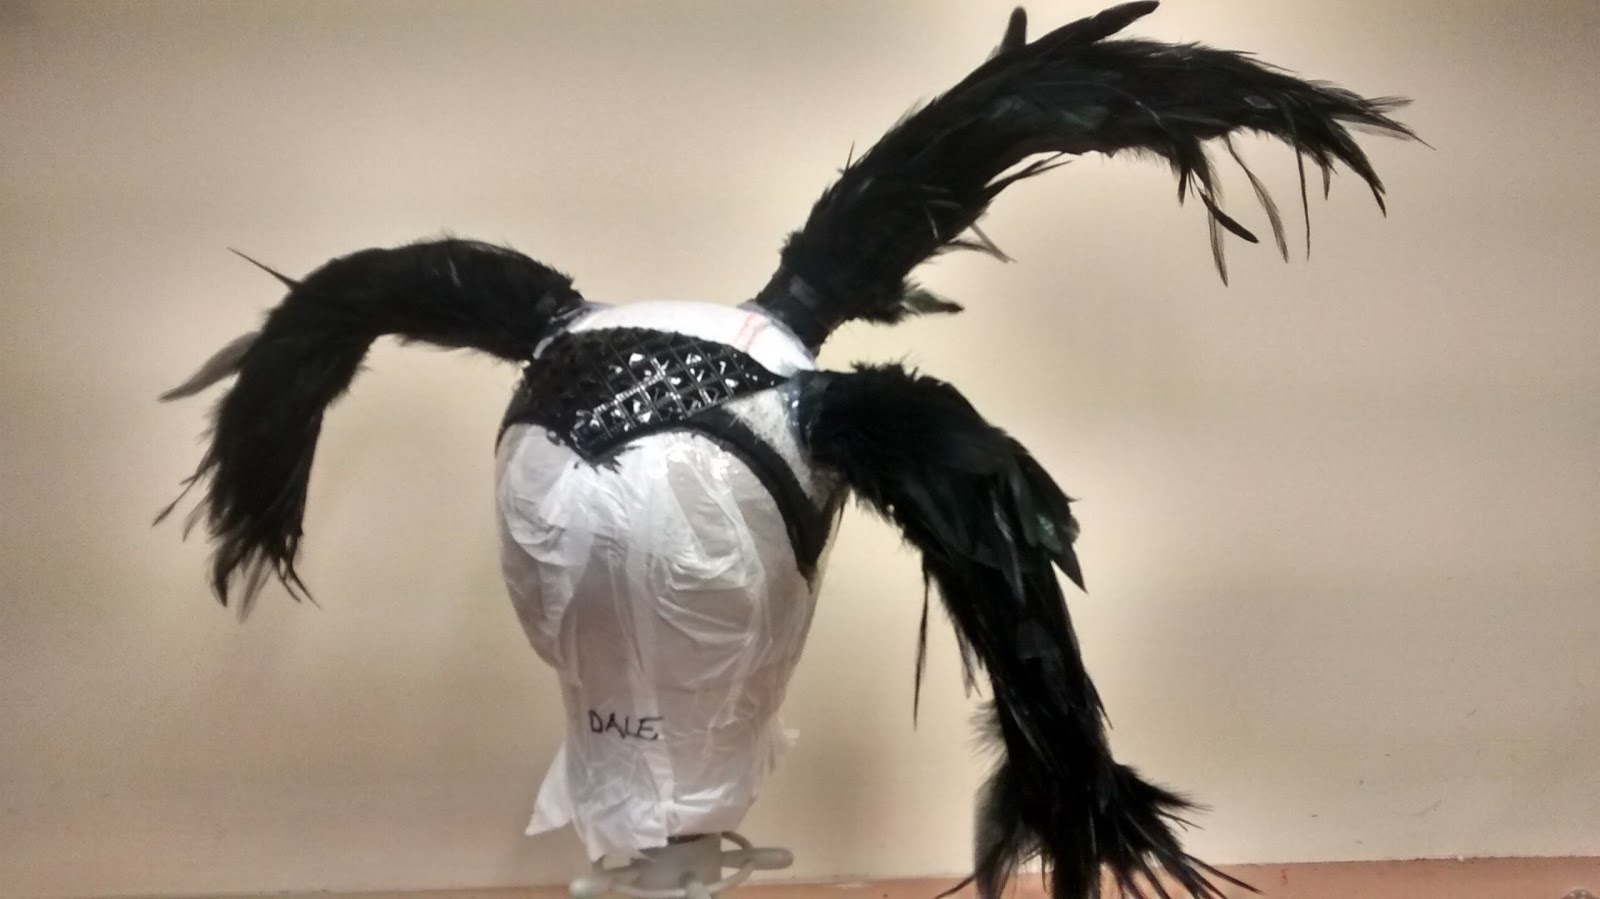
The Enchantress's headdress.  Her costumes were all made by Wendy Harrup.  And Carli Norris was a brilliant Enchantress!

The Enchantress's wedding headdress in action.  The King's costume was made by Corinna Vincent.

So, just to reiterate, I made the animal costumes, 5 costumes for Nurse Nellie, 2 headdresses for the Enchantress, 2 more horned headdresses for Nurse Nellie and Muddles (neither of which is shown here), as well as revamping a couple of older wigs for Nellie (adding butterflies to one for the finale, and a turban to another for the end of act one - not shown here.)

All in all, I had a lot on my plate, especially with the animal costumes, which took a lot of trial and error on my part!  I'm very pleased with the final results though, and looking forward to taking on yet another panto at the Mercury in 2018.

In the meantime I will try to do a better job of recording the work I do that's NOT panto-related!  I'm currently working on a pair of completely hand sewn 1780s stays that I started in a class at The School of Historical Dress the other week, so I will definitely blog about that soon.

I've also got this year's Victorian Ball fast approaching.  I've got a client commission to complete for then, as well as a full set of undergarments and a gown for my mum, who will be joining me this year.  Realistically I'm unlikely to have time to complete a new gown for myself, so I will probably wear last years again, and add the trim I didn't get around to doing this time last year.  I never actually posted that dress on my blog, but you can see photos on my website, -here-.  Hopefully I'll actually remember to get pictures at the venue this time around!

Monday, 26 February 2018

Snow White: Part Two

Snow White closed at least a month and a half ago, so it's probably about time I share some more photos on here.  I've requested some promotional shots from the theatre, but in the mean time here are more of mine.  You'll have to excuse my poor quality camera phone, as well as the fact that the dresses all made for a man with a 40" chest are being shown on a size 8 female mannequin.

I made 5 costumes for the dame this year.  First up:

Nurse Nellie's "Basic" - or, the main costume she wears in Act 1

The 'waterfall' back drapery is my favourite part.

It's an all-in-one dress - even the crinoline is attached - with a CB zip for easy quick change.

Nellie's "Mirror" dress
A classic scene, in which Nurse Nellie and Muddles both end up hiding behind the Enchantress's magic mirror, and hilarity ensues as they each pretend to be her reflection.  Both wear an exaggerated version of the Enchantress's gown and headdress.


Me testing out the pointy shoulders!  They're made with a layer of eva foam underneath to support the shape.

Nellie's End of Act 1 Dressing Gown.

A simple shape but sewing on all that feather boa took a lot longer than I care to admit!

Nellie's "Hunting, or Riding" dress. 
Very much inspired by 18th century redingotes, but with smatterings of Victorian in the hoop shape and upper sleeves.  That's the fun thing about panto, it's all a big mash up!  Worn when Nellie et al go to the forest to look for Snow White.  

This is probably the one I'm most proud of as it had the most fiddly details. 


I was also pleased with all the pattern matching I managed on a quilted fabric.


And finally, Nellie's "Walkdown" - the name given in panto to every character's finale costume as they "walk down" and take their bow.


And the wig.  I didn't actually make the wig itself, but I did add the butterflies.

The other headdresses I made were the Enchantress's pale blue wedding henin, which you can see at the end of my previous post, and her main horned headdress, which she wears for most of the show.  I also made two humourous versions of this for Nellie and Muddles to wear in the mirror scene.

She wears interchangeable cowls with this; black and purple, depending on which dress she's wearing.  I was responsible for the structure of the headdress but the decorative details on this one were mostly the designer's (David Shields) handiwork.

Nurse Nellie's version, not quite finished here (needs more bling!).  The skeleton's pose was my idea...

Annoyingly this is the most complete photo I have of Muddle's version.  I was going for a jester look with the horns in this one.  You can still see the white of the fosshape base underneath.  Each base was blocked on a wig block padded to the size of the actor's head.
And I'll save the animals for another post as this one is getting a little unwieldy.

Also, excitingly, we've been nominated for best costume design in the Great British Panto Awards!  Well done to David Shields for designing, and the whole costume team for being a crazy awesome bunch!

Monday, 6 November 2017

Snow White: Part One

I'm in the midst of the final rush for this year's panto at the Mercury Theatre; 'Snow White'.  I realise that I only ever seem to blog about panto-related work on here, I promise I do make other costumes too!  This year I was tasked with making 5 costumes for the dame (called Nurse Nellie in Snow White), as well as 8 animal costumes for the junior chorus (2x mice, 3x squirrels, and 3x rabbits), and a number of headdresses for several characters, including Nurse Nellie, the Enchantress, and Muddles.

I've been onsite for the past two weeks; doing fittings and putting the finishing touches into the animal costumes.  I'm now back home and I've got two weeks left in which to finish all the dame costumes, and then I'm back onsite for tech week, so the pressure is on!

No pretty finished pictures to show you, but here's a sneak peek of some of the things I've been working on in the last few months.


Sunday, 24 July 2016

Aladdin: Pagoda Costume & Wig

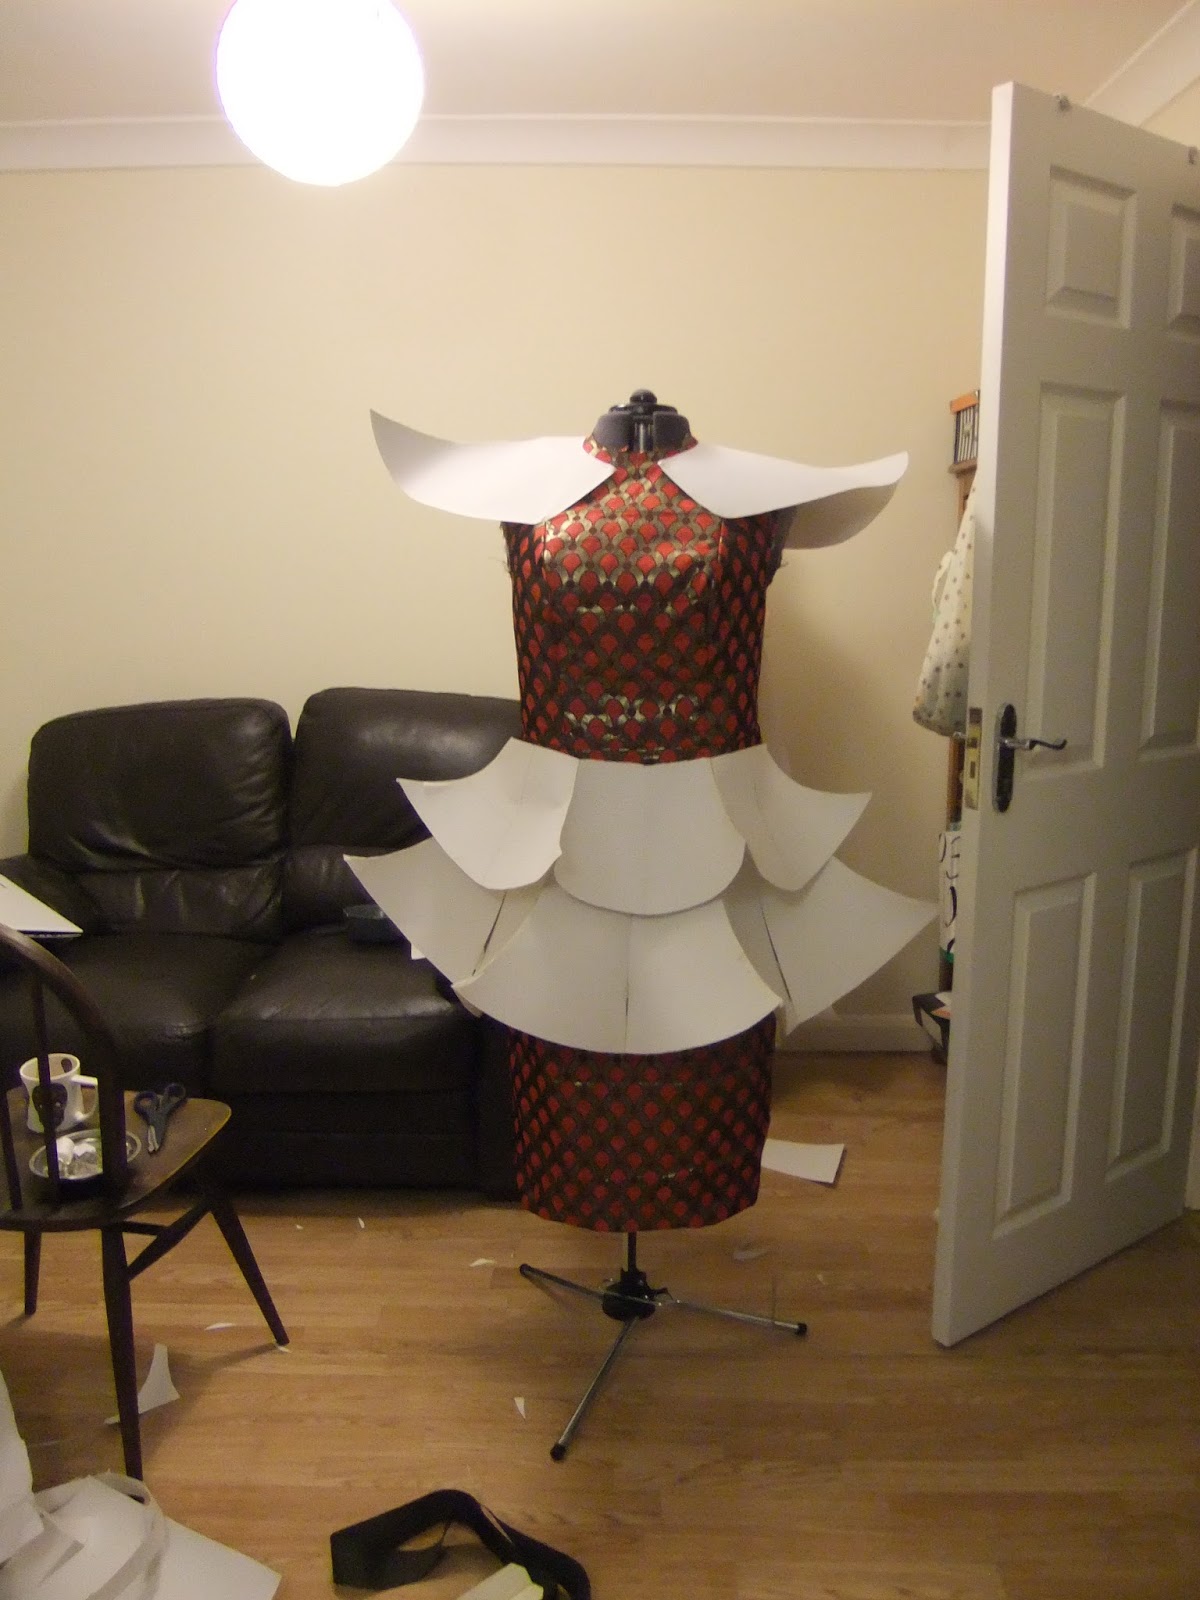
The pagoda costume ended up being the mad-panic-job at the end (there's always one).  Initially I was only making the wig, but about halfway through production I was asked if I'd like to make the structural elements of the costume as well, and I couldn't resist...

Mocking up the collar and skirt in card. 

Finished skirt patterns.

Cassie checking out the fosshape.  For the wig bases I always steam fosshape over a head block, but for the costume panels I stiffened the fosshape first with an iron, before cutting it into the skirt panels and collar.

I'd included an overlap seam allowance on one side of each panel, so they could be secured together with a zigzag stitch.

The pagoda headdress came together fairly similarly.

Here you can see that I glued in a square base on each tier, for the pillars to stand on and support.  The pillars are the kind used in a tiered wedding cake; spray painted red to match the fabric.

All fabric attached.  Most of this had to be pieced together from scraps, as I was very low on fabric by this point.

Trimmed and ready to go!

The completed costume!  Excuse the unpressed dress fabric, these photos were taken about 5 minutes before the courier was due to collect them


The collar attaches to the dress with two poppers in the front, and one at the CB, as well as a hook and eye fastening at the neck.

The skirt has a hidden waistband with a side seam opening, also fastened with poppers.

Tuesday, 24 May 2016

Aladdin Wigs: Padding the wig block, and steaming the fosshape foundation

As I've mentioned before, my annual Oct/Nov job is making the wigs worn by the Dame for the Mercury Theatre's Christmas Pantomime.  Last year was my third year on the job, and involved the wigs I'm most proud of.  Luckily for me, each year as my skill level has increased, so have the complexities of the designs.  So in the first year, thankfully, they were fairly simple whilst I was working out the methodology of creating the structure, and using fosshape and synthetic hair for the first time.  In my third year however, I could afford to work on something a bit more involved.

For 2015, the theatre chose to put on Aladdin, and so I was tasked with the making of six wigs for Widow Twanky, as well as a 'pagoda' costume that was added to the mix partway through.

Designs and measurements on the back of my studio door, ready to get started.

This year I chose to use a different method, and so far the best method, for transferring the actor's measurements to the wig block.  To do so I first wrapped the top of his head, including all hairlines with cling film.  I then used layers of scotch tape directly over this to hold the cling film to the head, and continued to tape until the entire hairline and head were covered. I then took a sharpie and traced his hairline, which still showed from underneath, onto the tape.  I'd used scotch tape for this purpose as marker pens tend to rub off regular sellotape.  I also marked out the top of the head, CF & CB, and ear to ear over the top.  Once I had all my markings, I could ease the tracing off his head, and mount it on a wig block.

Once the hairline was taped onto the block, I padded out the rest of the head by cutting slits into the top of the tracing, and padding out the inside with strips of newspaper until the shape was completely padded out to match the tracing.  I could then tape the slits shut.  I also taped over all the sharpie markings so they wouldn't rub off during steaming.  I then sharpied over the top of this so that the hairline markings would get transferred to the fosshape when steamed.  I had to re-sharpie the hairline every couple of goes in order to keep getting a clear mark on the fosshape.

The brown shows the original hairline, but I enlarged to the orange line to give a bit of wriggle room to stop stray hairs peeking out.
This method allowed for a really accurate head measurement, and I will continue to use it for future wigs.

I then created the fosshape wig base much as I've always done.  First I cut and sewed up a basic skullcap shape in the fosshape, and pinned it over the wig block, making sure it would cover all the hairline.


Then, using the hand held steamer in the photo, I thoroughly steamed the entire thing until it was completely snug around the head, and there were no soft patches left.


I could then ease this off the block, and use the transferred sharpie line on the inside of the fosshape to trim it to the correct hairline.


Here you can see one trimmed, painted with acrylics, and with a wire frame to hold up the large hairstyle pinned in place.