Friday, 23 September 2016

Jane Austen Festival 2016

I've been wanting to go to the Jane Austen Festival for a few years now, but have always either run out of time to make a costume, or had other things on that clashed, so I kept having to put it off.  This year, as work was keeping me busy, I was once again in danger of waiting yet another year.  Luckily this time I'd planned ahead, and already had a day dress I'd made for myself in June.

I decided to just go for the promenade on the Saturday, so I could at least get a feel for it this time round, and maybe go for a longer period some other year.  I invited my mum along, who was excited to get her own costume, and my dad ended up coming too to take some photos.

I tried rag curls overnight, and they were semi successful.  I just pinned up the ones that didn't work out so they were hidden by my bonnet.  Unfortunately we were rained on for most of the promenade, so the successful curls didn't stay that way for very long.

Putting a brave face on for the rain.

Lucky I was wearing cotton, it dried pretty quickly. 
From behind.  Mum didn't want her face shown, which is why I've cropped her out of the other photos.

After the promenade we had lunch in a nearby restaurant, then checked out the market stalls in the Assembly Rooms.  To be honest, I was a little underwhelmed by the whole experience.  Being rained on didn't bother me, but I feel like, not knowing any of the other promenaders beforehand, the experience wasn't really set up in a way that made it easy to meet people.  We chatted a bit with the people around us before and as we walked, but that was about it.  I think part of it was because there were SO many people, and I'm a naturally introverted type.  I think if we'd gone to one of the events that involved milling around with a smaller group of the same people for a few hours, that would have helped a lot with the social aspect.
I really enjoy the Prior Attire Victorian Ball - and the group dances and circular tables for eating at all contribute to creating a more intimate atmosphere where it's easy to relax and get to know the other dancers.  So perhaps I should have tried going to the Regency Ball that evening as well... but alas, I had no gown for it!

Oh, and the other thing about being in a Regency Promenade is that it's rubbish for costume admiring!  All I could see were the ones in our immediate vicinity.  Oh well, you live and learn.  I'm glad I went, and I won't rule out going another year, I'll just have to try out some of the other events besides the promenade.

In costume news I've decided that I do actually need some regency stays to wear with this.  I thought that, being small busted, I could get away with just a bodiced petticoat, but because there's no lift whatsoever it just leaves the front of my bodice looking a bit sad and droopy.  Not the best look.  I also feel like the bonnet suited a later period than the dress, so that'll have to be rectified at some point too.  I am happy with the fullness of the skirt in the back though, yay, cartridge pleating!

Sunday, 18 September 2016

Dick Whittington

I'm hard at work on various costume pieces for Dick Whittington at the moment, which is preventing me from doing any historical sewing.  I can't really complain though, as I've been given some wonderful designs and costume props to sink my teeth into.  Alongside costumes for Idle Jack and costumes and wigs for both Sarah the Cook and Ratty King; I've also been asked to make all the rat heads and tails for the ensemble cast.  I've been documenting as I go so will put up a few panto how-to posts once the show has opened.

A sneak peak.

I've also been asked to make some fairy wings, which I'm very excited to have a go at!  I very nearly got the chance to for Sleeping Beauty a few years ago, but the job went to someone else so I've been hankering after an opportunity to give wing making a try.

I've got a Dame fitting on Tuesday that I need to finish a couple of toiles for, but I couldn't resist doing a bit of googling for fairy wing inspiration in my coffee break.

FaeryAzarelle

FaeryAzarelle on Deviantart does beautiful wings made from iridescent film and an aluminium frame.  I don't have access to a water jet machine for cutting aluminium, so I'd be tempted to use a thin cuttable plastic sheet for the veins.  I've seen tutorials of other people using cardstock, but I'm not sure how durable that would be - and this does have to hold up for panto!

A couple of other options:

Fairy Godmother Wings from the live action Cinderella film
A very sophisticated take on the old nylon stretch over wire technique, from On Gossamer Wings
Plenty of food for thought, but now I must get back to Sarah's oversized sleeve puffs...

Wednesday, 24 August 2016

Just whiling away my evening looking at 1870s inspiration for the Victorian Ball next year, and the background to this one caught my eye.

Girl:  Mum, lets go fell walking in the Lake District this summer.
Mum: Sounds great, I have the perfect dress for that...


Ok yes, there is a horse and trap waiting for them in the background, but that shepherdess' crook means business, surely?

Tuesday, 26 July 2016

Aladdin: Photos!

And thus, 6 months after Panto finished, I'm finally rounding off my Aladdin series with some photos from the show.  The Mercury ended up selling all the costumes on to Salisbury Playhouse, so if you fancy catching them in action you can do this Christmas as well!

I was really lucky with photos this time, unlike in the previous year when the Slosh wigs were the only ones that got photographed onstage.  


The Pagoda wig and costume in action.  I really like this photo!

The Lampshade wig.

Carmen Miranda.  Luckily there were no issues with fruit falling off during the run. 
The Imperial wig.  One of my favourites.

Slosh wig.  I had to make two 'headscarves' as they need cleaning between shows.  The headscarf slots onto the base and is secured in place with several large poppers. 
Mid- Slosh scene... this is why the Slosh wig needs cleaning...

I didn't actually get any making-of photos for the Juliet Bravo wig, but it was the simplest to do.  The police hat was bought online, then I covered the crown in two layers of white lycra and added the trims and badge.  You can see my previous post for how I do the hair.

Our dame, Ash, was really lovely to work with, and I'm happy to say that he'll be returning for Dick Whittington this year, so no need to alter the padding on my wig block - score!  I'm also especially pleased to have been asked to take over the making of all the Dame costumes in addition to the wigs for this year's show, so I'm really excited for that, especially as I've loved the costume designs I've seen so far.

I've actually already made a start on Panto this year.  Whilst in previous years my wig making schedule was confined to Oct-Nov; this time I've been asked to do a lot more costume work.  I'm currently working onsite until the end of August, and have already made good headway with the Ratty King and Idle Jack costumes.  Next week I'll hopefully get on to figuring out how to make some rat headdresses/masks...  I quite like the idea of giving varaform a go, as that's one thermoplastic I've yet to try.

September through to the end of November I'll be working on Dame (at home, rather than onsite) so I'm going to be busy busy busy for a while.  Hopefully I'll squeeze in a few historical dresses when I can...

Sunday, 24 July 2016

Aladdin: Pagoda Costume & Wig

The pagoda costume ended up being the mad-panic-job at the end (there's always one).  Initially I was only making the wig, but about halfway through production I was asked if I'd like to make the structural elements of the costume as well, and I couldn't resist...

Mocking up the collar and skirt in card. 

Finished skirt patterns.

Cassie checking out the fosshape.  For the wig bases I always steam fosshape over a head block, but for the costume panels I stiffened the fosshape first with an iron, before cutting it into the skirt panels and collar.

I'd included an overlap seam allowance on one side of each panel, so they could be secured together with a zigzag stitch.

The pagoda headdress came together fairly similarly.

Here you can see that I glued in a square base on each tier, for the pillars to stand on and support.  The pillars are the kind used in a tiered wedding cake; spray painted red to match the fabric.

All fabric attached.  Most of this had to be pieced together from scraps, as I was very low on fabric by this point.

Trimmed and ready to go!

The completed costume!  Excuse the unpressed dress fabric, these photos were taken about 5 minutes before the courier was due to collect them


The collar attaches to the dress with two poppers in the front, and one at the CB, as well as a hook and eye fastening at the neck.

The skirt has a hidden waistband with a side seam opening, also fastened with poppers.

Sunday, 5 June 2016

Aladdin Wigs: Headdresses

Once the hair was done, it was time to move onto the individual designs for each costume.

The six wig designs for Widow Twanky were as follows:
  • Imperial China inspired semi-circular headdress
  • Juliet Bravo police hat
  • "Lampshade" hat, riffing off of Asian conical hats
  • Carmen Miranda fruit headdress
  • Slosh scene headscarf
  • "Pagoda" hat, with matching Pagoda themed structural costume.
Of these, only the Slosh and Carmen Miranda designs didn't have a visible hairdo underneath.

I started by mocking up the Imperial headdress in card.

The headdress was made with two layers of buckram sandwiching a layer of plastazote.  The gold fabric was glued on with copydex, and additional decorations added with uhu.  I drilled a hole in the end of each hairstick, pulling the end of the tassel through, wrapping it round the stick, and fixing with uhu.  Still, the headdress looked a bit bare for my liking...

Much better!
The Lampshade hat ended up taking a lot longer than anticipated.  The structure was made from millinery wire, and then the whole thing had to be covered by hand as it obviously wouldn't fit under a sewing machine.  I used bias tape to hide the millinery wire.  Chinese lantern baubles served as earrings, sewn onto the wig itself.
Carmen Miranda was also trickier than expected.  I first built a base plate for the fruit to sit on, before covering  this with a layer of wadding, and then the outer sequin fabric draped into a turban look.
The difficulty came with getting the fruit to stick.  I used a hot glue gun, but initially had trouble with the glue peeling off.  The central pineapple texture was especially bad at adhering to the rest of the fruit.  To combat this I attached pins to the fruit that would be touching the pineapple, then drilled small holes in the pineapple, slotting the pins in place (pointed downwards so they wouldn't slip out) and secured it all with more glue.  This seemed to fix it better, but I am going to keep mulling that one over for alternative methods in the future.
The slosh scene required a particularly robust headdress.  For those not familiar with Panto; the slosh scene is a traditionally messy part of the show, usually involving a food fight, or mud being chucked about, or in the case of Aladdin, an extended laundry scene in which the Dame goes head first through a clothes wringer, and is doused with soap suds.  Obviously an actual head of hair wouldn't last one night, so I usually get given some kind of headscarf design.

I started with a millinery wire foundation, covered in waterproof fabric.

For this costume, the mic pack needed to be inside the wig to protect it, so I left a window in the back for it to be slotted through.

The headscarf top fabric was lined with a layer of crin and another of waterproof fabric. 
And one more layer of waterproof fabric for good luck!
I don't have any more process photos, but the triangular headscarf was wrapped over the waterproof lining, and the two long ends knotted together at the front.  When I was happy with the positioning, I sewed the headscarf to the fitted lining.  The whole thing can be pulled off the wig base (it's secured with poppers so it won't slip during the performance) so that it can be cleaned between shows.  I actually made two of these, so there's no need to worry about one drying in time for an evening show after a matinee.  The front of the wig base also has a row of heavily pva-d curls along the forehead.

This post is getting rather picture heavy, so I'll conclude next time with the Pagoda wig and costume, and some photos of everything in action.

Friday, 3 June 2016

Regency Drop Front Dress

I recently joined the CoBloWriMo(Costume Blog Writing Month) group on facebook, which is encouraging costume bloggers to increase their blogging prolificacy with daily prompts throughout the month of June.  Today's prompt is to write about a new technique you've recently learned or would like to learn.

Since writing my to do list a couple of weeks ago, I'm pleased to say that I've made some progress, and now have my very own Regency day dress!  I certainly learned a few new things along the way.

Hungarian Chick Bib Front Gown
I decided to make a bib front dress; as The Hungarian Chick's tutorial (here) was very clear and easy to follow.  I wanted to make it more historically accurate though, so I poured over the fantastic close up photos of (this) gown at the National Museum of Australia, before discovering Katherine's Drop Front dress construction photos on her blog (here).  I ended up following her instructions almost to the letter.

1810-13 Silver and Blue Shot Silk Dress - Australian Dress Register


For the bodice I used the pattern in Patterns of Fashion as a guide, and draped on the stand, before checking the fit on myself.  This is the final pattern after alterations.


Cassie guarding the dress fabric for me.


The interesting thing about 18th and early 19th century bodice construction is that the lining is put together first, and the top fabric is then mounted on it in sections, and top stitched in place.  This is the new technique I wanted to try out for myself, so first I cut the lining in linen and felled the side back and shoulder seams by hand.


I then placed the brown cotton back piece over the top, and secured it with a running stitch within the seam allowances.  Next I smoothed one of the front pieces over the lining, and pinned it in place.  I turned under the seam allowance at the side back, shoulder seam, and front edge, and topstitched each one with a half back stitch.  I did the same for the other side, and secured the top and lining layers together with a running stitch along the neckline and hem.


I'd given the bodice a 1cm seam allowance all the way round, so I turned this under and slipstitched it down.  As you can see, the bodice top fabric doesn't extend as far as the linen flaps at the front.  When this is worn, the flaps cross over at the front, and the bib is secured over the top, hiding them from view.  Using only one layer for the flaps allow them to lay more smoothly over the bust.


Back view prior to slipstitching.


Cassie helping me cartridge pleat the skirt.

I don't have any more photos of the construction, or of the finished garment, as I've yet to wear it anywhere, and my dress stand is currently in use (next up, a chemise a la reine!), but as soon as I have some nice ones, I'll be sure to post them here.

Sunday, 29 May 2016

Aladdin Wigs: Hair!

Almost all the Widow Twanky wigs required quite a tall, rather severe hairdo underneath each headdress or hat design, and to create that kind of volume I needed a supportive structure.  As previewed in my last post, I created this out of millinery wire, using a fine gauge wire to wrap the joins (much faster than wrapping with thread, which is what I used to do!).  I covered each one in a layer of net, and then sewed them to the fosshape base with a heavy duty thread and a straw millinery needle.


Here you can see several wigs in different stages of hair addition.  I started by padding out the sides and most of the the head with extensions teased into hair rats.


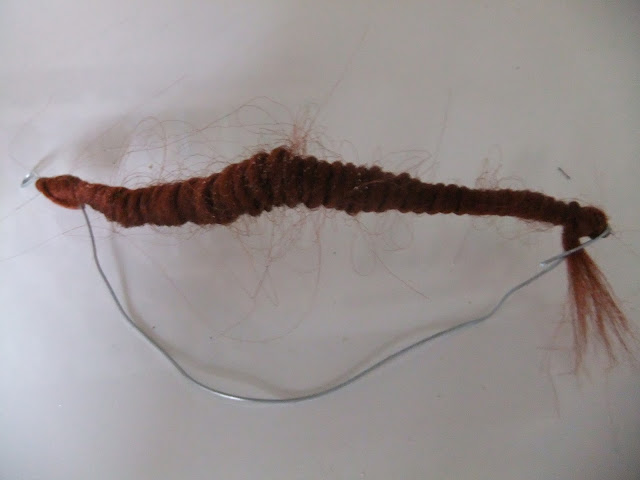
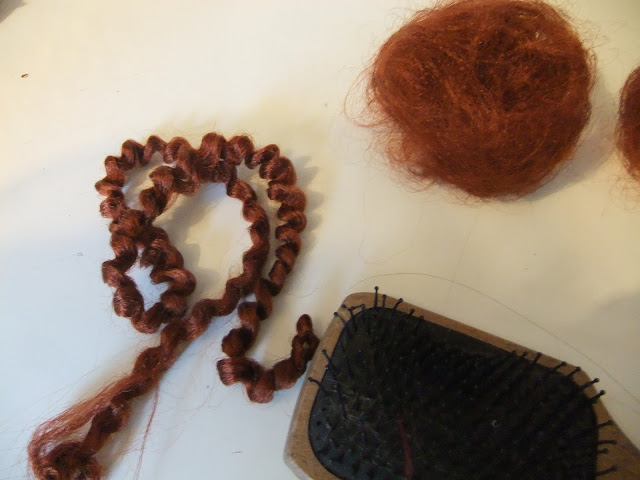
To make a hair rat, I first took a section of hair, and wrapped it tightly around a piece of wire.  I looped the wire back on itself as shown in the photo to stop it unraveling. This I sprayed liberally with hairspray, and then blow dried until completely dry.


When the hair came off the wire, it was tightly curled.  I brushed out each one, and fashioned it into a hair rat, as shown above.


Then I tacked each one on in a matching thread with big stitches.

Almost ready for the smooth top layers.  This got tacked down a bit more first!
The hair extensions I used came loose in the packet, so to create strips of hair that I could sew down in layers, I first cut strips of net, then attached hair evenly along each strip with a zigzag stitch.

This is how my studio looked for most of this job.


Each layer of hair was attached with the net facing towards the inside of the hairstyle.  I kept the hair in plaits whilst sewing it on, to avoid knotting.


Then the hair was smoothed over the top of the head and secured with layer upon layer of small stitches in a matching thread.  I used a curved needle and kept the stitches fairly loose, to avoid pulling at the hair too much.


The kiss curls were made by pinning short extensions into position then applying lots of pva glue to secure the shape.  Once it was dry I could cut off the excess 'tail'.  I don't recommend pinning to polystyrene, as I ended up having to pick off bits of styrofoam that had gotten stuck to the glue.

Finally, once all the hair was on, and sufficiently secured in place, I went over each wig with multiple fine layers of clear spray varnish.  My favourite is Rustoleum Crystal Clear, as it doesn't leave a dusty residue, unlike another brand I could name... (Valspar)

Stay tuned for the final looks, as well as how to build a wig that'll withstand a slosh scene!